Crafting your own beer is an exciting journey into the world of homebrewing. While traditional brewing often involves large-scale operations, one gallon beer brewing offers an accessible entry point for beginners and seasoned enthusiasts alike. In this comprehensive guide, we'll delve into the fundamentals of one gallon brewing, exploring the equipment, ingredients, and step-by-step process necessary to create delicious small batch brews right in your own kitchen.
Step 1: Getting Started with One Gallon Brewing
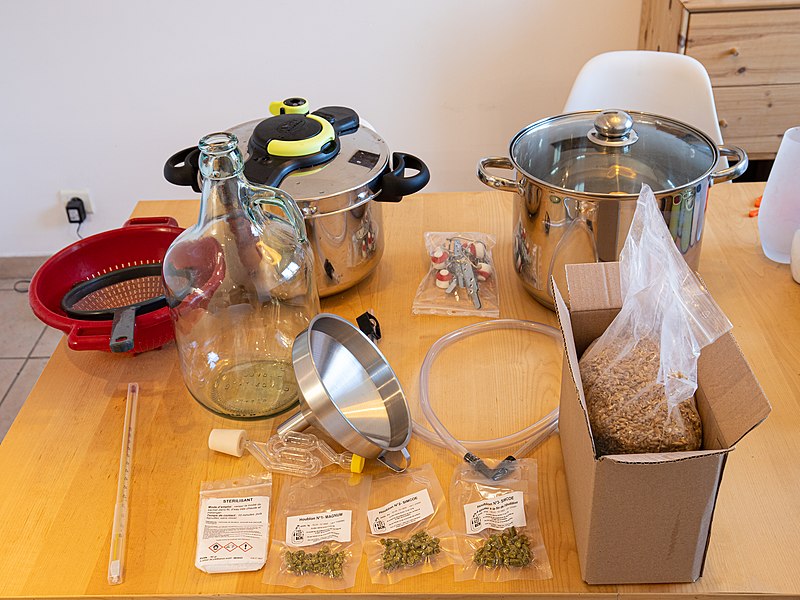
Essential Equipment and Supplies:
- A gram scale accurate to 1 decimal place.
- Reusable mesh bag
- Two gallon bucket and lid for primary fermentation or try our 1 gallon starter kit.
- One gallon fermentation vessel (glass jug).
- Airlock and stopper
- Brewing kettle (2-5 gallon capacity)
- Thermometer
- Mini auto-siphon and tubing
- Bottling equipment (bottle filler, bottles or fliptop bottles, caps, capper
Sanitization Procedures:
- Both a cleaner and a sanitizer should be used. Each has their own function. Cleaners remove organics which are food for unwanted contaminants.
- PBW is an example of a cleaner. Use 1 tablespoon in 2-3 gallon of warm to hot water. Let it soak. Scrub surface with brush and rinse 3 X using water.
- Sanitizers remove the unwanted contaminants (bacteria and yeast). Star San is an example of a sanitizer. Dilute ½ oz in 2.5 gallons. Place in a spray bottle and or dip equipment just prior to use. It can be used wet. 30 seconds of contact will kill 98% of the bacteria. A good rule is to clean all your equipment after its use. Then it will be ready to sanitize just before use.
Step 2: Ingredients for One Gallon Brewing
- Grains: Base malts or extract, specialty grains, and adjuncts
- Hops: Varieties, bitterness, flavor, and aroma
- Yeast: Dry yeast
- Water: If using tap water, make sure it is chlorine or bromine free. Otherwise buy some spring water. RO water is not recommended.
- Additional Ingredients: Priming sugar, herbs, spices, fruits, and flavorings
Step 3: The Brewing Process
- Heat up 2.52 gallons (All Grain) or 1.75 gallons (Extract) of water to 160°F in a large stock pot. Note: This is a 1 gallon recipe add an additional 1.25 gallons of water for a 2 gallon recipe
- Turn off the stove. Remove from the burner if electric. Note: This is a 1 gallon recipe add an additional 1.25 gallons of water for a 2 gallon recipe
- Put the grain in the mesh bag and place in the stock pot.
- Stir the grain to assure no dough balls(dry spots) are present.
- Place a lid over the pot and let it sit for 1 hr (All Grain) or 20 min. (Extract)
- Remove the grain and continue to a boil.
- Extract only: Add the extract while stirring. Don’t let it burn on the bottom of the kettle.
- Add the hops according to the timing and amounts specified in the recipe.
- After boiling for 60 minutes, place the pot in a sink full of ice water.
- As the wort cools to room temperature, sanitize the plastic bucket and lid.
- After confirming that the wort is at room temperature (below 71°F), pour it into the plastic bucket aerating as much as possible. You should have 1 - 1.25 gallons in the bucket.
- Pitch the yeast.
- Place the airlock (be sure to put water or sanitizer in the airlock) in the lid and place the lid on the bucket.
- Wait 2 weeks.
- Using the sanitized auto siphon, siphon the beer from the bucket to the sanitized glass jug. Minimize exposure to air. Add the airlock.
- Wait 1-2 more weeks or until the beer is clear.
- Bottle into sanitized bottles using 2 tablespoons of honey or sugar as primer. Minimize exposure to air. After 2-3 weeks at room temperature, the beer will be carbonated and ready to drink. Cheers!
Embarking on the journey of one gallon beer brewing opens up a world of creativity, experimentation, and camaraderie within the homebrewing community. Whether you're a beginner looking to dip your toes into the hobby or an experienced brewer seeking new challenges, crafting small batch brews offers endless opportunities for learning and discovery. With the knowledge and techniques outlined in this guide, you'll be well-equipped to craft delicious beers that reflect your unique tastes and brewing style. Cheers to the art of one gallon brewing and the endless possibilities it holds!